As an Amazon Associate, we earn from qualifying purchases.
How can you add bleed in Illustrator? When preparing artworks for printing, adding bleed is essential. It ensures you do not encounter issues during or after printing your work. Failure to add bleed will most oftenly result to unexpected printing and finishing problems.
This article explains what bleeds are and why they are important. We also explain how to add bleed to your work in Adobe Illustrator.
What is Bleed in Illustrator?
Before learning how to add bleed, you need to understand what it is and why you put it. Bleed is the part of the artwork which extends beyond the trim area.
It ensures that after cutting you do not have a white margin. You therefore need to extend the artwork and elements beyond the sheet area.
Why you need Bleed in Illustrator?
Bleed area eradicates any chances of a white paper strip or margin after cutting. This is the main reason you need bleed. Additionally, the cutting process is not precise and the paper moves a little. Bleed allows the paper to move without causing cutting errors.
Quick Steps to add Bleed in Illustrator
- Go to File>Document Setup.
- A menu dialogue will pop up; under Bleed and Slug, set the bleed amount you need. This may vary from document to document. For example, a 3 mm bleed is perfect for a business card but not for a hardcover book cover.
- Click OK. You will notice a red border added outside the artboard size. This is the bleed area.
- If you can not see the red border, go to View > Show Guides.
- After introducing the bleed to the document, you need to add it to your design. Set your document artboard size.
- Any solid color coming up to the edge should run up to the red bleed line border. When saving the document, make sure to include the bleed area and crop marks in the final output.
Adding Bleeds to a New File
You can either add bleed to a new document or to an existing one. Below are simple steps to follow.
Step 1: After opening Illustrator, Go to File>New to create a new artboard. A pop up comes up.

Step 2: Set the Page elements like size, orientation and number of pages. Set the bleed in the circled panel below in whatever dimensions you are comfortable with. You can set the standard 0.125 inches or 3mm.
Step 3: Once done, click create and the artboard is created with the bleed included. Below is how it looks. The artboard goes upto the white edge while the red border shows the bleed margin.
Bleeds to an Existing File
Step 1: Open or create a document by going to Control or N. Artboard options come up. If the artboard is already created, go to File > Document Setup or Control+ALT+P. A pop-up menu comes up.

Step 2: You can set a custom bleed size. Usually 3 mm. You can change the units from pixels to mm or inches as per your preference.

Step 4: If you set a certain figure on the first side and then click the circled chain-like icon, it automatically fills the other boxes or sides with the same-sized bleed value.
How to Export Files with Bleeds
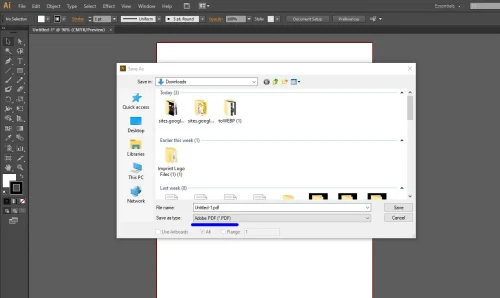
For print documents, PDF format is most recommended. Here is how to save with bleed.
Step 1: Go to File > Save As on the top menu
Step 2: Choose Adobe PDF at the bottom as the file format and click Save.
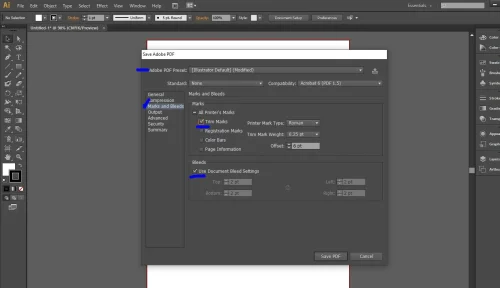
Step 3: A save PDF dialogue appears. Under Adobe PDF Preset, choose High Quality Print or Press Quality, then click the Marks and Bleeds section. Check Trim Marks, and ensure Use Document Bleed Settings is also checked.
How to add crop marks in Illustrator

To add crop marks in Illustrator, start by selecting the artwork you want to mark. Then go to the Object menu and choose Create Trim Marks.
Illustrator will automatically place crop marks around the selected object. These marks help show where the design will be trimmed but won’t account for bleed by default.
For more precise control, especially when preparing a file for print, it’s better to use the Print or PDF export method.
Open the Print dialog from the File menu, then go to Marks & Bleed and check the box for Trim Marks. You can also check Use Document Bleed Settings if your artwork includes a bleed.
When exporting as a PDF, choose Save a Copy and select PDF as the format. In the export dialog, go to Marks and Bleeds, enable Trim Marks, and also enable Use Document Bleed Settings to ensure your file is print-ready. This approach ensures the final output includes all necessary marks for accurate trimming.
Frequently Asked Questions
What is the standard bleed area size for printing?
0.125 inches or 3mm bleed on all sides is ideal for most printing jobs. Bleed appears as a reddish border beyond your artboard size.
Do you need a bleed on all designs?
No, you only need to bleed if the artwork goes up to the edge of the page. You do not have to bleed as you start, although it is advisable. It is also not needed on digital artwork.
What is bleeding, and why is it important?
Bleed area refers to any design beyond your trim area edge on a printed page. Extending your artwork beyond the actual cut area makes sure that no unprinted edges appear after you cut.