When working with shapes, knowing How to round corners in Illustrator can greatly diversify the kinds of designs and shapes you can create. Unfortunately, the steps in this tutorial can only be done using Adobe Illustrator CC and not earlier.
Related:
- How to Copy in Adobe Illustrator
- CorelDRAW vs Adobe Illustrator
- What is Illustrator and How is it used?
What you will learn
By the end of this article, you will be able to easily:
- Convert Text to a Shape
- Round all corners of an object
- Round a single corner
- Round multiple corners
- Set the curve type and radius
- How to make basic shapes
How to Convert Text to a Shape in Illustrator
The first instance you may want to make a text into a shape is when you have finished creating your design and you are about to save the file for printing.
It is highly recommended to convert your live text objects to curves. The curved object is classified as a shape. Go to the type tool and type the letter F.

To convert your text to shape objects, just select your text and click Control>Shift>O on a PC and Command> Shift>O on a MAC.
Alternatively, you can navigate to Type>Create Outlines with your live text selected. Once your sentences or words are changed to curves, Ungroup them by clicking Shift>Ctrl>G on PC and Shift>Command>G on MAC to edit each letter individually.
Rounding all corners in Illustrator Shapes
To round corners in Illustrator, you just need to click and drag live corner widgets using the direct selection tool. The live corner widgets appear on the inner side of an object that is in curves. Below is an example.
- Convert your letter to outlines by clicking Shift+Control+O on the PC
- Select the object you want to curve using the selection tool or shortcut
- Using the direct selection tool, click on one point and drag down. All points are automatically selected and curved.
How To Round A Single Corner on Your Shape
If you want to round a single corner, just follow the same process but do not select all points, but only the one you want to curve.
Before selecting with the direct selection tool click once on the artboard to deselect everything, then click on the point you want to curve.
A selected point and one that is not selected is the blue outline on the selected one. Drag down to curve it.


To round multiple points but not all, follow the above process but once you select the first Live corner widget, hold down shift and select another one to select both.
After that click and drag down to the curve.


How to set up Corners and Radius
If you want to set a certain type of corner or radius, just double-click on the point. A pop-up menu comes up.
You can set the radius or corner type. Basically can be defined as how far you drag the point on the manual method.

How to make a shape in Illustrator
The basic knowledge of How to make a shape in Illustrator, and fill it with color or outline it builds a good base to start off learning the software.
Shapes are very important in Graphic Design. They form the basic building blocks of any design or illustration that you will create.
Just like most other tasks in Illustrator, there are a number of ways you can create basic or complex shapes.

Basic shapes refer to simple shapes such as Circles, Rectangles, lines, etc. When using Illustrator, they are the easiest type of shapes you can make.
To create a basic shape go to the toolbar
Step 1: Click and hold on the rectangle which is the default shape. A drop-down menu with other shape options will come up. The shortcut to this function on the keyboard is the letter M.
Step 2: To create any of the shapes, just select, click and drag.
If you want a perfect square instead of a rectangle, just hold down the shift key as you drag. It will draw a perfect square, circle, etc.
How to draw a triangle in Illustrator

From the drop-down menu, you will notice the following shapes Rectangle, Polygon, Ellipse, star, and line. You will notice that some shapes such as triangles or oval shapes are not represented. So How do you create triangles in Illustrator?
Step 1: Click and hold the rectangle key on the toolbar, this time choose star instead of Rectangle.
Step 2: As you drag, click the Arrow Down Key on your keyboard. It will draw a star but reduce the number of points as you click to 3 points.
Clicking the UP Arrow Key will increase the number of points from a five-point star to 6 7 and so on.
The same applies to the polygon. Clicking up the Arrow keys as you drag increases the number of points and the down keys reduce the number of points.
How to Make a Triangle in Illustrator using the Polygon Tool
The Polygon Tool allows you to make shapes with multiple sides. In this tutorial, we will use it to make an equilateral triangle with all sides and angles equal.
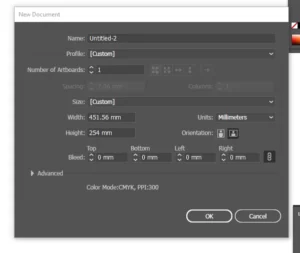
Step 1: Go to File>New or Control+N to create an artboard. A pop-up menu will come up where you can set your document. Choose Ok.
Step 2: Choose the polygon tool. You can get it by clicking and holding on the rectangle too.

Step 3: Click once on the artboard. It will prompt you on a pop-up window to set the number of sides on your shape. Set it as 3 and click OK.

Step 4: Click OK and your rectangle is created.

Method 2: Alternatively, you can choose the polygon tool then click and drag to draw the shape on the artboard. Before letting go of your Mouse, click the down arrow keys to reduce the number of sides and up to increase.
For a triangle, click until you have 3 sides.

Make a triangle using the star tool

You can also make a triangle using the star tool instead of the polygon. To do this follow the same steps as the polygon using the star tool instead.
After creating your artboard, choose the Star tool and click once on the artboard.

Choose 3 sides and click OK. A triangle was created. Just like the polygon tool, you can also click and drag with the star tool selected.
Before releasing your mouse, click down or up arrow keys to reduce or increase the number of sides.

Both these methods will create an equilateral triangle. What if you want a right-angled triangle?
How To Make a Right-Angled Triangle
A right-angled triangle has one of the angles at 90 degrees. To create it in Illustrator, you will use a different tool and style. Here is how.
Step 1: After creating the artboard, select the rectangle tool and click once on the artboard. Make the sides equal and click OK to create a square shape.

Step 2: A square shape is created. Click the Scissors tool or C shortcut. With the square selected, click on the corners of the square to cut.
Step 3: Delete one side of the square by clicking the delete key on your keyboard.

Step 4: Pick the pen tool and click on the 2 endpoints to join them. You will know where the exact joining point is by a small circle formed.

How To Make A Round edged Triangle in Illustrator
After making the triangle using any of the above methods, select it with the direct selection tool.

Click and drag down the inner corner anchor points inwards. The corners are automatically rounded.

That is it. You now know 3 simple ways you can make a triangle in Illustrator.
Making a using the Shape Builder tool

Using the shape tool to make shapes is rigid and can only make a defined number of shapes. If you want to create custom shapes, you can use the Shape Builder tool.
The shape builder tool will allow you to combine shapes and remove some areas of the shapes that you do not want. You will however need to use the shape builder tool together with the native shapes such as ellipse and rectangles.
Step 1: Draw 2 circles overlapping each other
Step 2: With the circles selected, Choose the Shape builder tool or shortcut Shift+M on PC.
Step 3: Click and drag, you will notice some areas shaded and others unshaded. Shadows show areas on the 2 shapes that you are combining.

You can use this tool to create great custom shapes and even logos depending on your creativity.
Make a shape using the Pen tool
Another way you can make custom shapes is by using the pen tool shortcut P.

Clicking once with the pen tool creates a point, and clicking again on another point creates a line.
You can use the Pen tool to trace shapes from any custom image. Some artists use it to create art because the path you draw can be created to a stroke.
Understanding the pen tool is very important when using Adobe Illustrator. We recommend you go to our first article on How to use Illustrator if you are a complete beginner.
How to Draw A line in Illustrator

Creating, joining, and cutting lines can also result in shapes and drawings from lines. Here is how to work with lines. Choose the line segment tool from the toolbar.

Step 1: Click and hold the rectangle tool and choose a line from the drop-down menu
Step 2: Click on the artboard and drag to draw a line. Hold down the shift for the line to flow straight.
How to use the Line Segment Tool?

First, To join 2 lines in Illustrator, use the direct selection tool to select the 2 ends you want to join only.
Click Control>J on PC or Command>J on MAC with the 2 points selected and they will be joined.
To split a line in Illustrator, go to the toolbar and choose the Scissors tool. Click once on the point you want to break the line. The line is split to 2.

4 Methods to Cut A Shape In Illustrator

- Method 1: Using Pathfinder tool
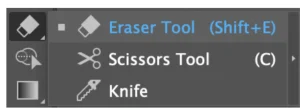
- Method 2: Using The Eraser Tool
- Method 3: Using Scissors Tool
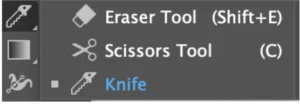
- Method 4: Using the Knife Tool
Method 1: Cut out part of a shape using the Pathfinder tool
To open the Pathfinder tool, go to Windows> Pathfinder and a pop-up menu will appear.

Note: If you want to use the Pathfinder tool to cut an object, you need at least two overlapping objects. You can use any option from the Pathfinder panel on a single object. In this example, I will use a black rectangle and magenta circle.
In this tutorial, I will show you the options used in the Pathfinder tool to cut an object (which is 70% of the options), including Trim, Divide, Minus Front, Minus Back, Exclude, Intersect, and Crop.
See how you can cut an object using each of the options below. Once you have decided how you want to cut your object, simply select the object and click one of the options below. You can ungroup to separate the cut objects.
Trim/ Minus Front
You can use the Trim Tool to cut the shape from the top layer of an object. Creating a paper-cut effect. For Example, you can use it to make a logo cut for some marketing materials.

Divide
The Divide Tool is similar to the Trim Tool. This tool cuts and divides an object into different parts along its intersecting paths. You can use it to change the colors of different parts within a shape or move the shapes around to make a shape poster.

For example, you can turn something like this: into something like this: As you can see, the only shapes I used were circles and squares but then it created more shapes after I cut the overlapping paths using the Divide tool.
Minus Front & Minus Back
Do you want to create a crescent moon? This is the easiest way to do it. All you need to do is create two circles and click Minus Front (or Minus Back).
Minus Front deletes the shape on top, while Minus Back deletes the shape at the bottom. If you choose Minus Back, as you can see, it cut out the bottom lighter-colored circle, leaving the darker color shape of a crescent moon.

Exclude
This tool deletes the overlapping area of overlapping shapes. This makes it easy to cut overlapping areas. For example, you can use make abstract patterns decorative borders, and text effects. This tool is opposite to the Exclude tool because it only keeps the shapes of the intersecting (overlapping) area shapes.

Crop
Crop Tool almost looks like the Intersect tool except that it does not delete the top object. Instead, You can see the selection, ungroup, and edit it. You can ungroup to edit it. In general, the Pathfinder Tool can be used to cut objects to create new shapes.

Method 2: Using The Eraser Tool
The Eraser Tool can be used to erase brush strokes, pencil paths, or vector shapes. Select the Eraser Tool (Shift + E) from the toolbar, and brush on the areas that you want to cut.
There are a few circumstances in the Eraser Too doesn’t work. For instance, if you are trying to erase a live text or a raster image, it wouldn’t work, because the Eraser Tool only edits vectors.
Simply choose the Eraser Tool and brush on the part of the object that you want to cut out. For example, I erase/ cut a small part of the heart so that it does not look dull. You can adjust the eraser size by pressing the left and right brackets [ ] on your keyboard.
Method 3: How to cut A shape in Illustrator using Scissors Tool

The scissors Tool is great for cutting and dividing paths. When you want to cut an object filled with strokes, scissors can help. Let me show you a quick example of how to cut this cloud shape.
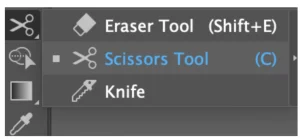
Step 1: Choose the Scissors Tool from the toolbar.
Step 2: Click on the path to select a path in between the anchor points that you clicked.
For example, I clicked on the two points that I had circled out. If you use the selection tool to click on the path in between, you can move it. You can also change the fill from stroke to color and see how the shape is cut.
Method 4: How to cut A shape in Illustrator Using the Knife Tool
The Knife Tool can be used to divide parts of a shape or text to make different edits, separate shapes, and cut an object. If you want to make a freehand cut, this is the best way to go.
This tool can cut or divide any vector shape. If you want to cut a shape from a raster image, you will need to trace it and make it editable first.
Step 1: Add the Knife Tool to your toolbar. You can find it in Edit Toolbar > Modify and drag it wherever you want it to be on your toolbar.

I recommend putting it together with other erasing tools.
Step 2: Choose a Knife from the toolbar and draw on the object to cut it. If you want to separate the shapes, you have to draw through the entire shapes.
Step 3: Ungroup to delete the part that you don’t want. You can move it or change its color. If you want to cut straight, hold the Alt key (Option key for Mac users) while you draw.

You can also use the Knife Tool to cut and edit the outlined text to create a text effect like this
You can apply the same process as cutting an object: Use the knife to draw the cut path, ungroup
and choose individual parts to edit.
In this article, I will show you How to make a Triangle in Illustrator. If you want to create other shapes, such as a circle or rectangle, there is a dedicated tool to do it. You can use the rectangle and ellipse tool to create them.
Compared to other shapes, making a triangle can be a little complicated. This is because there is no dedicated tool used to make a triangle. You can however easily manipulate tools used for other shapes to make triangles easily.
If you are looking for an Adobe Illustrator alternative, check our last post.
Conclusion
Whichever option you choose, your ability to edit the anchor points of the vector. The Pathfinder panel is the best for cutting to create new shapes. Scissors work best with paths and the knife is best for a freehand cut.
I can’t say which tool is the best because they are good for different projects. Remember all the tools I mentioned above have one thing in common: they only work on vector objects.
Related Posts
- Embedding in Illustrator
- Copy in Illustrator
- How to use Illustrator
- Make an image black and white in Illustrator
Frequently Asked Questions
How to slice a shape in Illustrator
Select the Shape: Open your Illustrator project and select the shape you want to slice.
Use the Knife Tool: Choose the “Knife” tool from the toolbox. Click and drag the knife tool across the shape to create a cut. You can create straight or curved cuts.
Pathfinder Options: Alternatively, you can use the Pathfinder panel. Duplicate the shape, create a new shape that acts as the cutting path, position it over the shape you want to slice, and select both shapes. Then, in the Pathfinder panel, choose “Divide” to slice the shape along the cutting path.
Cutting Grids: Illustrator allows you to split objects into a grid. Select the object, go to “Object” > “Path” > “Split into Grid,” and adjust the settings.What tools can I use to cut a shape in Illustrator?
You can use the Pathfinder, Eraser, Knife tool or the Scissors tool to cut shapes in Adobe Illustrator. These tools offer different cutting methods and can help you achieve the desired results.
How does the Knife tool work?
The Knife tool allows you to make freeform or straight cuts through a shape. Click and drag for a freeform cut, or click to define the start and end points of a straight cut.
How do you draw a simple triangle?
You can choose the polygon tool, then click and drag to draw the shape on the artboard. Before letting go of your mouse, click the down arrow keys to reduce the number of sides and up to increase.