As an Amazon Associate, we earn from qualifying purchases.
How can you embed an image in Illustrator? Adobe Illustrator allows you to use images in your design. There are different ways you can use to add an image to your Illustrator project.
Additionally, linking or embedding an image in Illustrator can make or break your project. What is the difference between the two, and why is it important? Should professional graphic designers embed or link images?
What You Will Learn
- The difference between embedding and linking images in Illustrator
- How to embed an image using the top bar
- How to embed an image using the Links panel
- How to check if an image is embedded
- When to embed or link images for best results in your projects
What it means to Embed An Image in Illustrator
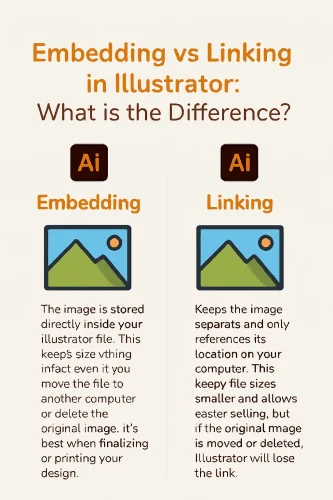
Embedding means that your image is directly included in Illustrator, and when you move the file to another computer or delete the image on your computer, everything remains intact and correct. Embedding is recommended when you intend to move your file to another computer or you are ready to send it to print.
Linking involves adding images in your file without importing them to the Illustrator file just by referencing items to a place where they are saved on your computer.
When deleted or renamed on your computer, the Illustrator file loses the images and prompts you to reconnect to the file’s new location. If you are still designing and are yet to finish, you can link images instead of embedding. Here is how to embed an image in Illustrator and why it is a smart move for any designer.
How to Embed an Image in Illustrator
You can either embed an image from the links panel or from the top bar menu. The first way to embed an image is by clicking ’embed’ on the top bar with the image selected. When you place the image on the artboard and select it, you will notice a button labelled ‘Embed’ on the top bar of Illustrator. When you click on it, the image is embedded.
Embedding images increases the file size and slows down your computer. For better file handling, I recommend changing file formats from JPEG or PNG to TIFF format. If the document is to be used for printing, make sure you check CMYK and RGB color modes.
Method 1: Embed from top bar

Step 1: Open Illustrator.
Step 2: Go to File > Place to import your image.
Step 3: Select the image you intend to embed.
Step 4: Click Embed on the top bar.
Step 5: To unembed the image, just click the top bar embed section again.
Method 2: Embed an Image from the Links Panel
After placing the image, go to Window>Links to bring up the links panel. Click V to pick the selection tool, then select the image. Click the 3 lines on the top right of the links panel and choose Embed Image.

Step 1: Go to File > Place to import your image.
Step 2: Go to Window > Links to bring up the links menu.
Step 3: Select the image you intend to embed on the links menu.
Step 4: Click the 3 lines in the top right corner of the links panel. Then choose ‘Embed Image’.
Step 5: To unembed, choose the 3 lines again and choose ‘unembed’.
How to tell if an image is embeded

You can tell whether the image is embedded by going to the links panel. You will notice the embedded image has an icon at the far right, like below. The unembedded image is blank at the right end of the links panel.
To know whether the image is embedded or not, go to the selection tool or shortcut V. Just click on your image in the design to select it. If it is not embedded, it will have an X-shaped line over it. If embedded, it will only have a border selection.

What does ’embed an image in Illustrator’ mean?
As a regular graphic designer, I always have to modify images to edit them in the future, especially when creating social media posts. Here are some instances where I had to embed images in my designs.
When you embed an image, it means that your image is saved in your Illustrator source file and can be used independently, even away from your computer.
Steps How to import an Image in Illustrator
- Open Adobe Illustrator.
- Go to File > Place from the top menu.
- Navigate to the folder where your image is saved.
- Select the image and click Place to add it to your artboard.
- Alternatively, you can drag and drop the image directly from your computer into your Illustrator workspace.
Related Illustrator Tutorials
- Copy in Illustrator
- How to use Illustrator
- Drawing an Arrow in Illustrator
- Make an image black and white in Illustrator
Frequently Asked Questions
Why is it important to embed an image in Illustrator?
When you have images embedded, you can easily edit the file from another computer without having to look for the images again. Failure to embed images will force you to look for images again and redo your design on another computer.
Embedding vs Linking in illustrator, What is the difference?
Embedding means the image is stored directly inside your Illustrator file. This keeps everything intact even if you move the file to another computer or delete the original image. It’s best when finalizing or printing your design.
Linking keeps the image separate and only references its location on your computer. This keeps file sizes smaller and allows easier editing, but if the original image is moved or deleted, Illustrator will lose the link.How to add an image in Illustrator
Go to File>Place, then navigate to where the image is save and click on it. Alternatively, Create an artboard in illustrator then drag and drop the image to illustrator.
how can you unembed an image illustrator?
Select the embeded image, and go to the top menu where you clicked when embeding the image. Click the unembed button. You can also go to the links panel and bring up options. Choose unembed from the drop down.