As an Amazon Associate, we earn from qualifying purchases.
In this post I will show you how to draw a circle in Illustrator. Like other shapes in Illustrator, creating it is not very complicated. Simple shapes like circles and rectangles will form the basis of many complex designs you will create in the future.
It is therefore important for beginners to understand how to create and manipulate circles. Unlike PowerPoint or Word, Illustrator will help you create circles with better accuracy. It also allows you to easily edit them or change the stroke weight and fill colors.
Mastering other Illustrator tools like Pathfinder will allow you to manipulate simple shapes into complex custom designs. The best tool to use for creating your circle in Illustrator is the native Ellipse tool (L).
What you will learn
In this guide, you will learn three simple methods to draw circles in Adobe Illustrator—using the Ellipse Tool to click and drag, setting precise dimensions, and converting a square into a circle.
You’ll also discover how to create dotted circles, make semicircles, and customize fill colors and strokes. These basics will help you build a strong foundation for creating more complex designs in Illustrator.
Methods to create a circle in Illustrator
- Method 1: Click and Drag
- Method 2: Set up Circle Dimensions
- Using Square Shape
Method 1: Clicking and Dragging
Step 1: Set up your document and page. Open Illustrator and click File > New. Choose a preset size (e.g., A4, Letter, Web 1920×1080) or set custom dimensions.
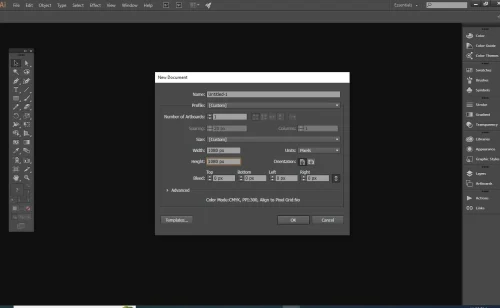
Create a name for your file, something meaningful you will not forget. Choose units that you are comfortable with. I prefer using mm, but you can choose any one you want. Pixels, or px, are ideal for screens and digital work. Inches and millimeters are perfect for print work.
Before creation, consider the size you are working on. The intended usage will determine the size to set. For printing, set the color code to CMYK and RGB for web and screens. Click Create on the pop-up. This will create an artboard to work on.
Step 2: Choose the Ellipse tool under the Rectangle tool, shortcut M. You can do this by clicking and holding your mouse down to bring up more options. You will see other tools like the rectangle, rounded rectangle, and ellipse tools. Choose Ellipse.
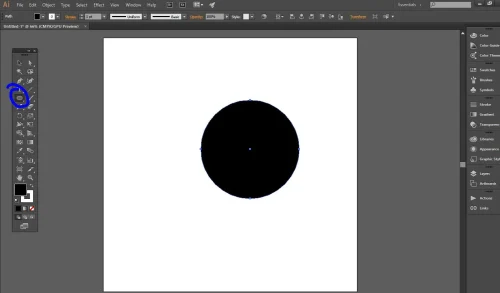
Step 3: To draw, you can click and drag to create your circle shape. To make a perfect uniform circle, hold down Shift as you draw.
Method 2: Set up Circle Dimensions
For precise size and dimensions, follow the below steps.
Step 1: Create the artboard like in step one in the last method. File>New.
Step 2: Choose the shape tool, shortcut M. Click and hold to bring up the Ellipse tool.
Step 3: After picking the tool, click once on the drawing artboard. A pop-up comes up requesting you to input values about the size. Input your desired size.
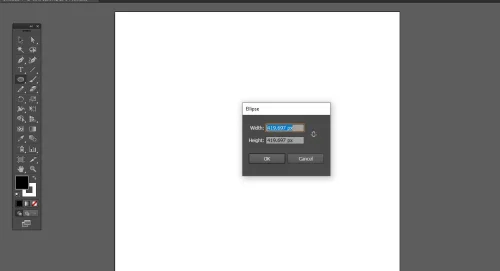
Step 4: Choose OK to accept.
Step 5: After creating your circle, you can fill it with color or change the stroke size, weight, or color.
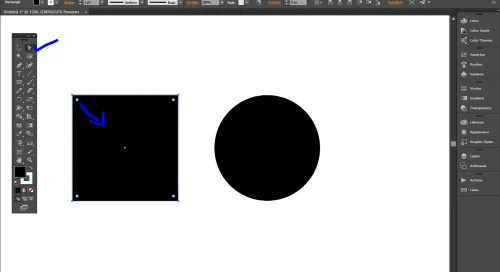
Method 3: Using a Square Shape
Step 1: Create the artboard by going to File>New and setting up file options.
Step 2: Click M to choose the rectangle tool.
Step 3: Click and drag, holding down shift, to create a square shape.
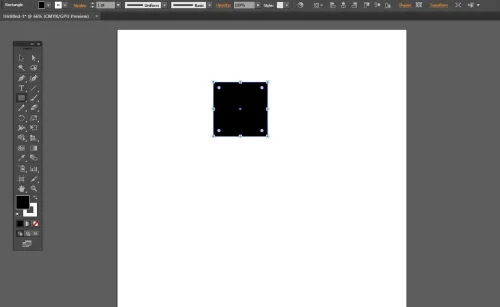
Step 4: Choose the direct selection tool (A) and click and drag one of the corner nodes in the square shape’s inner corner.
Step 5: A circle is created.
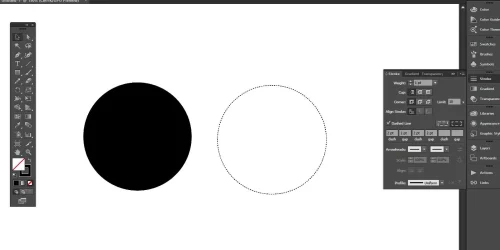
Create a Dotted Circle in Illustrator
From the circle you created by any of the above methods, choose a stroke instead of a fill color.
Step 1: Create the artboard by going to File>New and setting up file options.
Step 2: Click M to choose the rectangle tool.
Step 3: Click and drag, holding down shift, to create a square shape.
Step 4: Choose the direct selection tool (A) and click and drag one of the corner nodes in the square shape’s inner corner.
Step 5: A circle is created.
How to Make a Semicircle in Illustrator
To make a semicircle from your shape will require you to slit your circle on both sides. First, change it from Fill and Stroke to Stroke Only. Choose the scissors tool shortcut C.
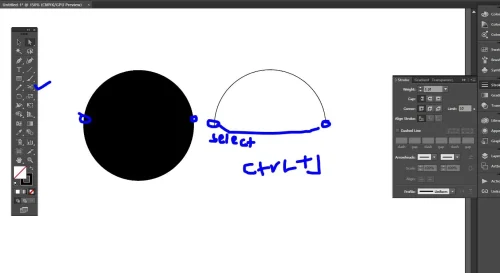
Click on the sections along the stroke you want to split. Choose the direct selection tool and select areas or points you do not need and hit delete.
You need to join the new endpoints so that you can fill the semicircle with color. Choose the Pen tool (P). Click on one point, then the next. If on the same path, they join to complete the half circle.
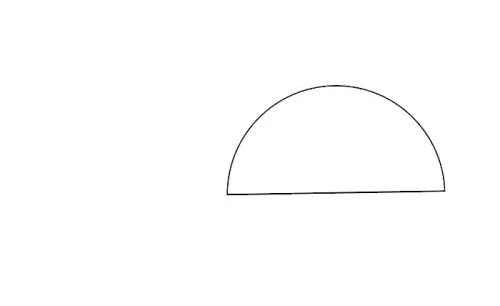
You can now fill it with color.Alternatively, you can use the direct selection tool and choose both end points. Click Control+J on PC or Command+J on Mac to join the two points and close the shape.
Frequently Asked Questions
What tool is the best for drawing a circle in Illustrator?
The Ellipse Tool, shortcut (L), is the best for drawing a circle in Illustrator. To access it, click and hold the rectangle tool. A drop-down menu comes up. Choose the ellipse tool.
How can you draw a perfect circle in Illustrator?
As you draw your circle, hold down the shift key on the keyboard.
After selecting the Ellipse Tool, click and drag while holding down the Shift key to draw a perfect, uniform circle.How to change the fill color and stroke weight of a circle?
Click on the circle you have just created. Under the tools menu, toggle either fill color or stroke on and off. To change the color, double-click, and a color panel comes up. Choose the color you want. To change stroke weight, select the circle and go to Window>Stroke. A pop-up appears showing the stroke weight in points. You can change the weight to 2 pts or more as required.