As an Amazon Associate, we earn from qualifying purchases.
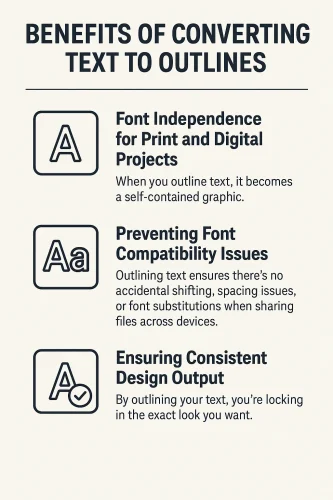
In this post I will explain How to Convert Text to Outlines in Illustrator and why it is important. Text in Illustrator can either be live and editable or outlined in preparation for printing.
When you save your Illustrator file, the text is editable, and you can open and change it. However, once you outline it, you cannot edit it because text is changed to points and shapes referred to as curves.
This is similar to vectorisation of text or fonts. The main purpose for this is to avoid font replacement when opened in a printer or another computer.
Some designers refer to this process as curving text in Illustrator. This is different for warping text along a curve or shape. In this post I will explain steps you can follow to convert text to outlines.
I will also explain different ways you can curve text around a circle, how to arch text in Illustrator or warp it in or around a shape, bend text and envelope it, and distort text.
What You Will Learn
In this guide, you’ll discover:
- Why and when to convert text to outlines
- 4 quick methods to outline text in Illustrator
- How to curve, bend, and warp text for creative effects
- Tips for editing and customizing outlined text
When should you outline Text in Illustrator?
Before you send your file to print or production, it is advisable to outline your text. This eradicates chances of the text or font being replaced or changed in case it is missing.
When you finish your work completely and do not intend to change the text later on. In case you are creating a custom typeface, you can edit the outline of your text to create points that you can use to edit the typeface.
4 ways How You Can Outline Text in Illustrator
Creating outlines is simple and straightforward. You can use any of the below simple methods to outline.
- Method 1: Outlining using Shortcuts
- Method 2: Right Click and Outline
- Method 3: Use the top menu to create outlines
- Method 4: Flatten Transparency
Method 1: Outlining using Shortcuts
Step 1: Select the text you want to outline using the selection tool or shortcut ‘v’.
Step 2: Click Shift+CTRL+O on PC or Shift+COMMAND+O on Mac.
Method 2: Right Click and Outline
Step 1: Select the text you want to outline by clicking on it.
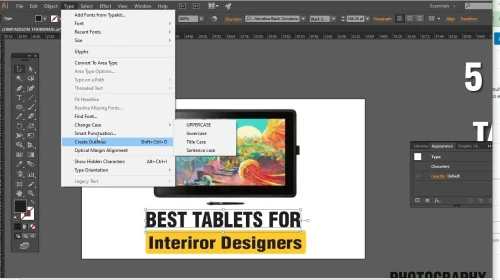
Step 2: Right Click on it and go to ‘Create Outlines’ in the drop-down menu.
Methods 3 and 4: Use the top menu to create outlines.
With the text selected, go to Type on the top menu, then choose to create outlines. Alternatively, select the text, then go to Object>Flatten Transparency>Convert Text to Outlines.
How to Curve Text in Illustrator
Outlining text in Illustrator can be referred to as converting to curves. In this guide, ‘curving text’ will refer to curving text around a circle, arching text in Illustrator, warping text around a shape, bending text in Envelope and distorting.
Curved text can be used to create stunning logos, merchandise, and T-shirts, with text wrapping around different symbols. The text can be half-arched around a circle or go around in a full circular flow. At the end of the post, I will create a step-by-step guide on how I used curved text and shapes to create these designs.
You can apply the curved text effect in different forms to achieve different layouts, such as wavy, arched, or bulk text. Below are 3 simple ways you can use Adobe Illustrator.
- Method 1: How to curve text around a circle
- Method 2: Curve Text by Typing on Path
- Method 3: Bending or Warping Text around a Shape
- Method 4: Arching text in Illustrator
Method 1: How to curve text around a circle
You can curve text along a path object. You can use a circle, a curved line, or any other shape of your choice.
Step 1: Create a path that you want your text to curve around. I will create an ellipse shape or circle.
Step 2: Click and hold on to the type tool to bring up the type on the path.
Step 3: Click along the circle’s edge or path and write your text.
Step 4: Adjust the text by going to Object>Type on Path Options or moving the bracket ends.
This method can also be used when you want the text to move along a curved line. You can duplicate the text and then copy it to the other side of the circular shape.
To adjust the alignment of the text, go to Type>Type on Path options and set it on the pop-up menu. Make sure to toggle preview and flip to the bottom side to view the changes.
Method 2: Curve Text by Typing on Path
Step 1: The first step is to a line or circle.
Step 2: Choose the pen tool or shortcut P. Click once on the artboard to create a point, then do the same on another part of the artboard. This time, hold down the mouse and drag to curve the point. Do the same for the third point. You can also create an ellipse shape.
Step 3: Click and hold on to the type tool to bring up the type on the path.

Step 4: Click along the circle’s edge or path and write your text.
Step 5: Adjust the text by going to Object>Type on Path Options or moving the bracket ends.

This method can also be used when you want the text to move along a curved line. You can duplicate the text and then copy it to the other side of the circular shape.
To adjust the alignment of the text, go to Type>Type on Path options and set it on the pop-up menu. Make sure to toggle preview and flip to the bottom side to view the changes.
Method 3: Warping and Bending text in Illustrator
You can also curve text using the Envelope Distort option.
Step 1: Click T and type to create your text.

Step 2: Go to Object Envelope Distort and choose Make with Warp.

Step 3: Choose any options from the drop-down. The options are the same as the warp option we discussed earlier.
Alternatively, you can choose to make it with mesh instead. You will follow the same process but choose Make with Mesh after Envelope Distort. Set the values on the pop-up menu to create movable anchor points. The nodes represent movable points using the direct selection tool.
How to Convert Text to a Shape in Illustrator

Step 1: Create Your Text:Start by creating the text you want to curve. Select the “Type” tool (shortcut: T), click on your artboard, and type your text.
Step 2: Create a Shape: Draw a shape that will serve as the envelope for your text. This shape will determine the curve. You can use the pen tool or any other shape-drawing tool to create the shape. Ensure that the shape covers the area where you want the text to curve.

Step 3: Select Both Text and Shape:Click on the text to select it, and then shift-click on the shape to select it as well. Go to Object>Envelope Distort>Make with Top Object.
Step 4: To adjust the curve after applying the envelope distortion, use the Direct Selection tool (shortcut: A) to click on specific anchor points of the envelope shape and manipulate them as needed.
Finalise and Refine: Make any additional adjustments to your text or envelope shape as necessary to achieve the desired curvature and positioning.
Expand (Optional): If you want to finalise the curved text and no longer need to edit it as an envelope, you can go to Object > Envelope Distort > Expand to convert it into editable shapes. Follow on YouTube for more.
Frequently Asked Questions
What does ‘outlining a font’ mean?
An outline font is the same as a shape or object in Illustrator. It is not editable like live text. The shape of the font is permanently created such that it cannot change once sent to print.
Is it a must to outline fonts before printing?
You do not have to outline fonts before sending to print. However, it is advisable to outline them to avoid issues from your printer.